POS Distribution for Retail Events: Plan, Deliver, Install, Derig

Retail POS and exhibition rollouts live or die on the details: timed access, marshalled loading bays, fragile displays, and tight de-rig windows. Get the planning right and you’ll avoid missed slots, damage, and spiralling costs—while delivering a stand that looks the part and performs.

Who this guide is for

  • Retailers and brands

  • Display manufacturers and printers

  • Event agencies and shopfitters

Pre-planning the rollout

Define the brief & assets
Confirm campaign goals, venue(s), hall and stand numbers, build and de-rig windows. Build a complete asset list: units, graphics, fixtures, AV, spares, and tools.

Dates, slots & documentation
Book delivery and collection slots early—major venues fill quickly. Prepare RAMS and method statements, public liability insurance, access passes, vehicle registrations, and any required permits.

Site access & restrictions
Check loading bay postcodes, marshalled routes, maximum vehicle heights/weights, out-of-hours rules, and PPE requirements. Note whether a banksman is needed and if forklifts are available.

Packaging, labelling & load build

  • Pack by component type: protect glass, acrylic and electrics separately.

  • Decide on palletisation vs loose load; brace and strap to prevent shift.

  • Label everything clearly: venue, hall, stand, item ID, box X of Y, and install order.

  • Add a top-box manifest plus a QR link to assembly instructions and wiring diagrams.

  • Keep essentials (fixings, Allen keys, gloves, wipes, spare graphics) in an easy-grab kit.

Choosing transport & crew

Vehicle selection

  • Small van: urgent small consignments and sample kits.

  • XLWB: long graphics, multiple cartons, up to 4–5 pallets.

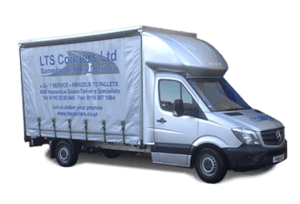
  • Luton with curtain sides: taller items, side loading, 6–8 pallets without jumping to an HGV.

  • 18T / 44T HGV: full campaigns, bulk pallets, tail-lift options where forklifts aren’t available.

Service style

  • Dedicated vehicles for fragile or time-critical POS (direct, no transhipment).

  • Two-person crews for handballing, white-glove positioning and on-stand adjustments.

  • Live tracking & single contact so store teams and venue ops know ETAs and changes instantly.

Delivery day: hitting the slot

Pre-advise the venue, confirm bay number, and arrive early to avoid missing windows. Follow marshalled routes, present paperwork, and proceed directly to the stand. Unload in sequence, stage items safely, and check against the manifest before sign-off.

Installation support

Bring power tools, fixings, cable management, spirit level, and cleaning materials. Build in a logical order: flooring → frames → graphics → electrics → finishing. Check levels, power and lighting. Capture photo sign-off for your records.

During the show

Plan replenishment windows for brochures or giveaways. Store flight cases and empties neatly (and labelled) for a fast de-rig. Have a rapid response option in place for breakages, loose graphics, or last-minute swaps.

De-rig & reverse logistics

Work in reverse order, protect edges and faces, and repack to the original standard. Record condition, note any repairs, and separate items bound for storage, reuse or recycling. Arrange returns to DC, cross-dock for the next venue, or short-term storage between dates. Dispose of waste responsibly (including WEEE and lamps if used).

Multi-site national rollouts

Sequence venues to minimise miles while meeting delivery slots. Use crew rotations for night runs and weekend access. Track assets with simple IDs or QR codes so the same graphic set isn’t duplicated or lost between stores.

Venue nuances: ExCeL & NEC at a glance

  • Timed access rules are strict—book early and stick to the slot.

  • Vehicle limits: know height/weight caps and which bays take tail-lifts.

  • Marshalled loading areas: allow queuing time and follow directions precisely.

  • Paperwork ready: passes visible, RAMS and method statements to hand.
    Top tip: pre-sort pallets by zone or stand area so the right pieces land in the right place without re-handling.

Cost & timeline factors

  • Vehicle size, crew numbers, handballing time and install complexity

  • Out-of-hours or weekend surcharges

  • Storage days between venues and reverse logistics

  • Ways to trim cost: combine replenishment with de-rig pickup; use a Luton with curtain sides for side-load access instead of stepping up to an HGV; cut re-handling by packing in install order

Quick checklist

  • Bookings & docs: slots, RAMS, insurance, passes, vehicle regs

  • Pack & label: protect, palletise, “box X of Y,” install order, manifests, QR guides

  • Transport: right vehicle, tail-lift if no FLT, two-person crew if handballing

  • On-site: tools, PPE, staging, photo sign-off

  • De-rig: repack, condition report, storage/returns, responsible waste

Why use LTS for POS distribution

  • Proven experience with exhibitions and retail rollouts (including ExCeL/NEC)

  • The right vehicle for the job—from small vans to HGVs with tail-lift options

  • Dedicated, two-person white-glove crews available

  • Live comms, timed deliveries, rapid problem solving, and careful handling from door to stand

Call to action

Planning a POS rollout? Get a quick quote and we’ll map your schedule, vehicle, crew and venue timings so everything lands on stand—on time, undamaged, and ready to sell.